Arduino CW Encoder (CW Keyer)
In some Arduino, HAM related project books, we found some designs for a memory CW keyer for using in Contests or so.
We decided to make use of the design of Glen Popiel. KW5GP.
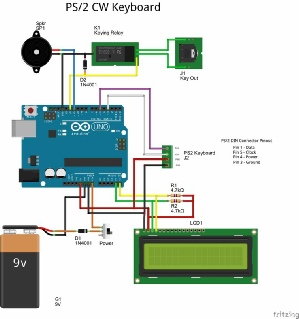
Basis of his design was making use of a standard PS/2 Keyboard (PC). Handy if you are not be able to use CW the normal way via a Straight key or paddle… or other reasons…hi
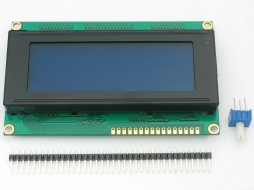
Also this design makes use of the well known 20x4 display, 4 memory-
His design was described perfectly in one of his books.
But, We wanted more…..!
We wanted larger memory-
Also we noticed there was something strange with the 20x4 display.
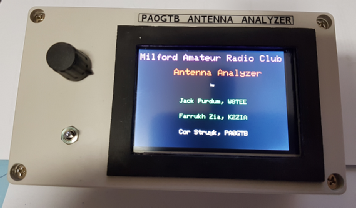
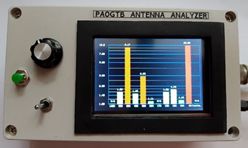
Arduino Antenna Analyzer
In the November 2017, Issue of QST, there was a article published about this Antenna Analyzer project. Several members oft the Milford Amateur Radioclub have build already this project. Proof for us that is should work …hi..
The desgin is very nice. Its totally dedicated to all the Ham radio Amateur bands, from 160 mtrs to 10 Mtrs.
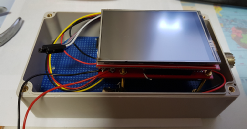
There is made use of a 3.5 Inch Graphical TFT Display.
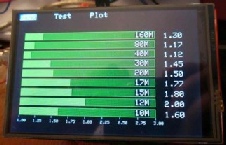
All the scans and measurements can be saved on a SD memory-
Measurements are selective on each band separately and its possible to compare them after you have modified the antenna.
To use this Antenna Analyzer portal, its provided with a
9V rechargeable Lithium Battery next to a external DC power-
It was a challenge again to find a nice enclosure again…
I found a nice enclosure on Ebay for just a few Euro’s.
With some manual labour, we’ve got a t the end a nice design for this project.
To finish the Enclosure, we have searched for a Bezel for this display, but we didn't find it. For a moment we have thought to ask someone to make a design via a 3D printer, but that was much to expensive.
So we decided to make something ourselves.
How did it started….?
Its just like our Ham radio Hobby… When you have your Licence and once started to make QSO’s and doing some Experiments, you wanted more and more…
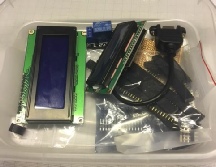
In February 2017 the VERON, Department Breda, organized a Arduino Workshop. In total 34 Hams take part and participated at these Arduino Workshop.
Han, PA0JEN and Edwin, PA7FRN did take care of the Workshop Program, Arduino parts, materials and documentation. Of course, there was also Homework to do and self-
Planned was a total of 4 evenings, but by the enthusiasm of the Attendees it was expanded to 6 evenings !
With lots of pleasure and enthusiasm we did this workshop and back home, we study and did some practice. And than… it happened…. :-
Unfortunately, after 6 weeks it was over and ended. But we wanted more and more of this…
Together with a HAM friend of mine,. Bert, PA1BM, who was also interrested in more, we decided to go on with more Ham related projects.
Via Ebay and Aliexpress we ordered some extra parts and materials and together we realised some nice Arduino Ham related Projects

Our First project
We decide to start with a easy project.
A Clock for in the Shack telling us Local and UTC time on a display.
O ja Yeah.. Also telling us Temperature and Humidity should be handy…hi…
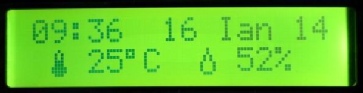
HAMSHACK Display
Started with the original code, we expanded it all. We did later things and expanded the desigan with some new Modules. We named the project Hamshack Display.
The display gives you indication of: v
- UTC time
- Locale time
- Temperature in the Shack
- Humidity
- Barometer pressure

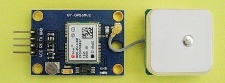
Arduino QTH Locator indicator using GPS
The basic information of our second project, was found in the VERON magazine of November 2015. In this issue, Hans, ON4CDU describes a nice Arduino project, using a GPS module and a Arduino Uno with some Arduino Code to calculate the HAM QTH Locator, based on the received card coordinates.
Our modifications :
We wanted to use a Arduino Nano instead of a Arduino Uno and we wanted a bigger, 20x4 display to display all the available information at once…
Also it must be possible to use it portable and not only connected to a DC power source.
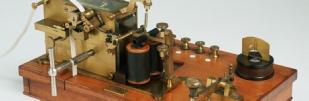
CW projects
The next 2 projects are CW oriented
For a long time we had the wish, to build a CW decoder. Just to give me some help by receiving CW signals. I have not operated CW for a long time. So I am a bit rusty…hi..
But also to have a tool to decode CW signal.
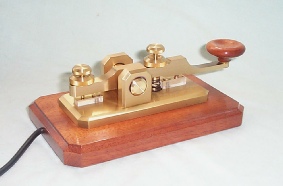
Also a CW Memory keyer to operate CW from a standard PC Keyboard. Nice to use for CW practice, but also as a tool for if the straight key is not suitable any more.
And of course a nice toool for Ham’s who have no knowledge to practice CW with a key.
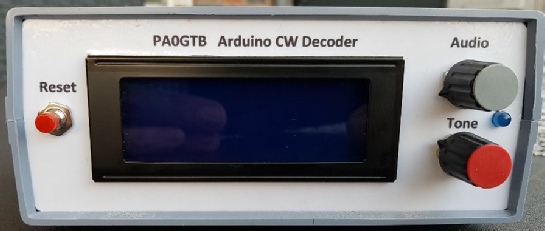
Arduino CW Decoder
Looking for a suitable design on the Internet, we’ve found many projects. One even more nicer than the other one…
At the end we can say, its was a nice project to do. Its a very use full device that we already have used many times in our Antenna experiments
Arduino Literature
Jack Purdum, W8TEE
Glen Popiel, KW5GP

We searched on Internet and several Arduino For a for a usable project.
Of Course, just having done a Arduino Workshop, don’t make you a real Programmer, but you can read the code and make some changes or add some other things to the program, just as you like.
And we did find a small project to begin with. There was only one problem : Its was wrotten in Italian Language…hi..
With the help of Google translator, we translated the code to English.
Afther that was done, we started to build the project on the breadboard
We added some extra code to switch automaticaly from Summer-
It was a very nice project to start with and using the knowledge of the Arduino Workshop in practice. We learned a lot of the several Time, temperature and Barometric modules in practice. Not everything you find on the Internet is usable.
Cheap will not always say the specifications are correct !!
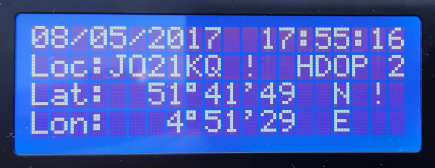
In fact, its a easy project. Only a few parts of hardware, a Arduino and a GPS module are used and the rest is software.
But, of course, we wanted different again….
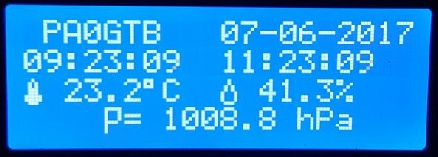
Afther modification the display tells us:
- Date and time (UTC)
- Card Coordinates
- QTH Locator
- Amount of Satellites in use
- Hight place, above Sea level
- Position of the Sun ( Additional)
Besides the designs, found in Books for Ham related Arduino Projects (see Chapter : Literature below), we found again a nice looking design in the VERON magazine of November 2015.
This project was based on a design from Bud, WB7FHC, bud modified with some extra features by PA0JBG. And by the way : There was a PCB available.!
There was a lot of information available, and many other Ham’s had already build this CW decoder. Such’s thins helps to make a decision !
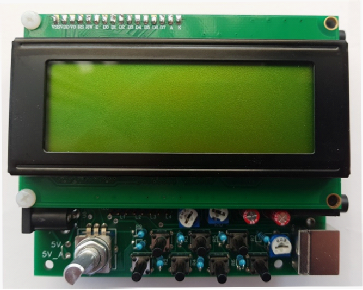
In this design they did make use of a 20x4 display. We find this better than a small 16x2 display.
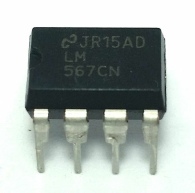
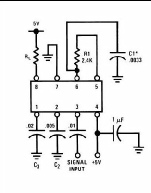
Included in this design was a LM567 circuit for tone detection and bandpass filtering.
That was one of our wishes. We wanted to decode signals between 600 and 1000 Hz with a bandwidth of 250 Hz,
PA0JBG has added some extra features to the original design. We’ve all tested them, but not added them all.
For the precision tone-
At he end the result was a perfect CW decoder which gives us a lot of help bij CW decoding on HF, especially when propagation and conditions are very poor.
We did make a direct contact with Glen, KW5GP via e-
Glen told us about the limitations in memory of the Arduino Nano or Uno controller. He also recognised the shortcomings of the 20x4 display. Is has to do with the internal hardware configuration of this display.
So… it should be difficult to change this..??
Again, a challenge to overcome….
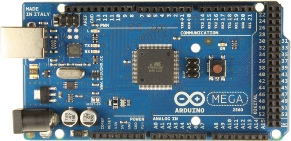
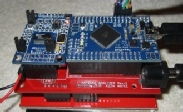
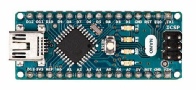
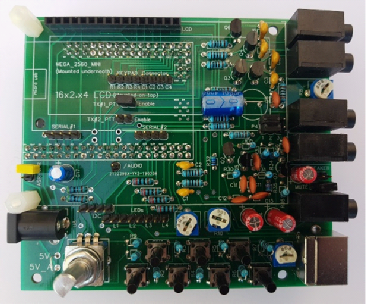
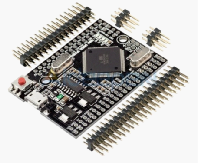
In the meantime we had learned a lot more of the Arduino Code than in the beginning…We analysed the limitations of the Arduino Controllers, and decided to make use of al lager Arduino Mega2560 controller.
This version of Arduino has much more memory available. And we did modify the Code of one of the Library's, so that we could make use of this larger memory.
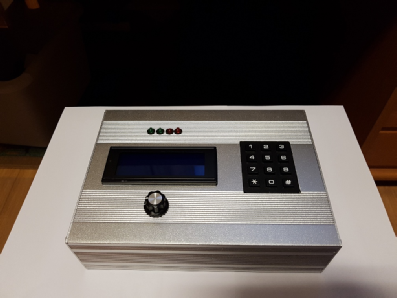
Professional memory Keyer
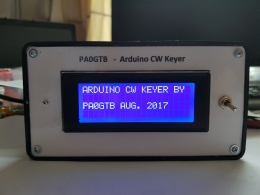
Due to the extra capacity of the Arduino Mega260 controller, we’ve got a Memory CW keyer with 8 memory-
It’s now possible to pre-
Ideal for CW contests.
And, with the help of Edwin, PA7FRN, we’ve managed to cure the strange behaviour of the 20x4 display too !
One project ready, another project to come….hi
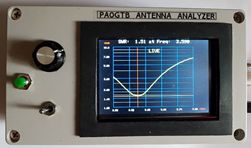
One of our wishes, was to have a HF Antenna Analyzer. Commercially these tools are very expensive, and its nicer to build your own…
So when we came back from our Summer-
In consultation with my Friend, Bert, PA1BM, we decided to make this our next project.
We searched several Chinese Websites to find the needed parts en ordered them together.
At the end of October 2017, most of the parts arrived and we started to assemble the PCB.
There are many books available about Arduino Ham Related projects
A big advantage is the fact that the described project in practice really works. (most times….hi)
Of course we bought some books after we finished the Workshop. But also on the Internet there is lost of information available. Lots of E-
Some books and Authors are :
During our project fases of the CW Keyer and the Antenna Analyzer, we had a direct e-
Both Authors publish on regular bases in QST and other magazines issued bij the ARRL
Morseduino, Semi-
This project exists of a Semi-
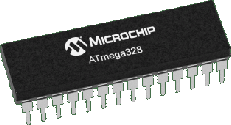
This design is based on a Atmel ATmega328p micro controller chip which we known of several Arduino Boards, like the de Arduino Duemilanove, and the Arduino Uno.
Only the most necessary parts are used to make it work like a real Aduino micro controller.
On the PCB we also find the already known LM567 tone-
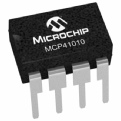
This designs difference from the earlier build CW decoder design of Hans, PA0JBG, by using a “digital potentiometer” the MCP41010.
This IC is a electronic 10Kohm potentiometer, which digitally can move the resistance value up and down in 256 steps, controlled by the Arduino software.
On the double sided PCB we find all the control buttons and a reset-
All controls and connections are also via Pin-
Of course there’s also a keyer possibility to practice and hearing the side-
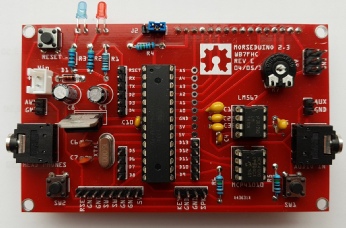
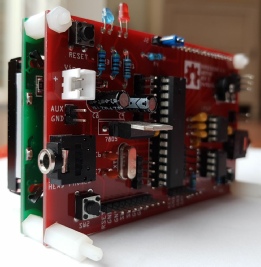
In this design, we again make use of the already known Arduino LCD display 20x4. But now we make use of a parallel connection. On board are controls to set the Backlight.
This decoder print is mounted “piggyback” to the PCB of the Display, making use of spacers.
This design easily can be used without the need of a enclosure or extra parts.
Practical experiences
Beside the fact that a few of my friends also successfully have build this “Morseduino” CW Decoder, Are there several Regional Ham radio Society's in Holland who have started DIY groups to build this Semi-
I know that already > 70 Ham’s have build this design.
Building this project gives you no problems if you read the instructions carefully. Using the right parts and look at the “High Speed Kit Build” video of Budd, WB7FHC, op Youtube. Budd is the original author of this design
Macro CW Keyer, Mr. Rags.
As a addition to the “Morseduino”CW Decoder project, I’ve also build this Macro CW Keyer design of Budd, WB7FHC. He’s called it “ Mr Rags. Why.. ? Well, with this design you can make a CW QSO very fast.
Its a Macro CW keyer, but not al real “Contest-
Its a programmable CW Memorykeyer
This keyer can automatically detect the fase your in during the QSO, just by pushing the Single Function key, and sending one letter yourself.
Its sends than the right stored macro.
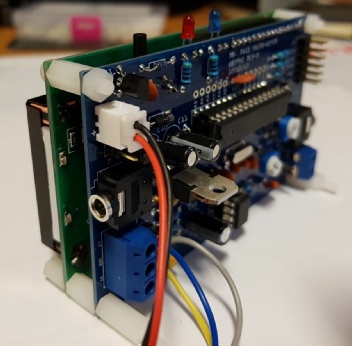
Just like the design of the “Morseduino”, is this project based on the Atmel ATmega328p microcontroller chip. Only a few parts make it act like a real Arduino microcontroller.
On the topside of the double-
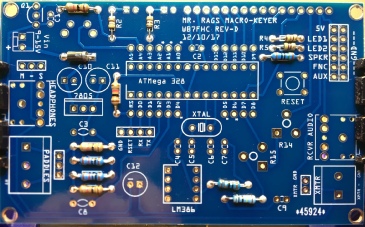
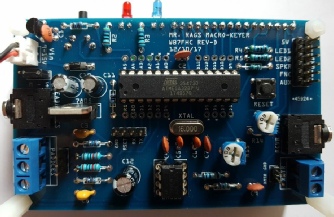
This design, based on the Atmel ATMega329P, exists further of a LM386 audio amplifier and some resistors, capacitors and other parts.
Connections for a Iambic Keyer and Loudspeaker are made by connection blocks.
This design is made for using a Iambic Keyer. Its possible to use a straight key, but in practice this is not handy.

The central placed function-
Related on his construction, you can use it several ways
All Menu settings, calling the Macro’s during the QSO, are done by this single switch.
Its a very unique design
Practical experiences
I, myself are not a fanatic CW user. I’ve away to long caused by my Job at the time. Therefore, this Arduino Based CW designs, are very helpful for me. Perhaps also for you ?
In the beginning, of course, you have to learn how everything's works.
But once you now how it works, you can do a standard CW QSO very fast…
Don't be afraid, You are always in control, and can always just use the key yourself…hi
It was a nice project to do again.
Expanding the possibilities (2018)
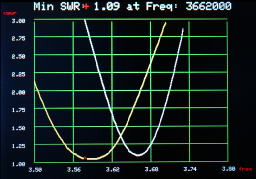
In the meantime this project has been modified several times. There is used another DDS Chip, AD9851, and new Software. The SWR bridge, originally designed with Germanium Diodes has been changed with two real logarithmic amplifiers AD8307.
You can now choose specific parts of the frequency spectrum and measurements can now be up to 70 Mhz. So the 6 meterband is now included.
Also the presentation of the results are changed.
K3NG CW Keyer / CW Decoder
In the last year, people have ask me if it was possible to write something about a project for a combined CW decoder / encoder. So, “All in One”.
Well, one of my wishes on my bucketlist, was to find a good, reliable, project to build such a combined CW decoder / decoder
The K3NG design, introduced by Kees, K5BCQ
Documentation of the K3NG CW memorykeyer / CW decoder
Such a project with so much options and possibilitys, can’t be done without good documentation. On the Github Website; https://github.com/k3ng/k3ng_cw_keyer/wiki You will find all the information of the K3NG design.
DIY Single band QRP HF CW Tranceiver
It could not fail to happen of course…
After al those articles and projcets about CW tools, based on a Arduino Microcontroller, it was time to build myself a small CW tranceiver..
So searching the Internet for a nice design..
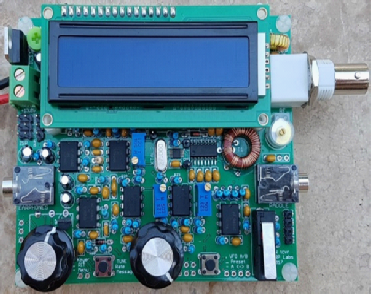
The Result :
Now I have a Regional weather station, giving me all weather parameters in one sight, and showing me the weather-
Het eindresultaat bestaat uit een Regionaal weerstation wat alle belangrijke parameters van het weer in de regio actueel laat zien.
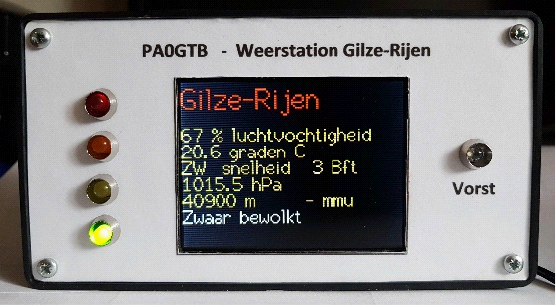
Weather parameters in Sight :
The weatherparameters displayed are :
-
-
-
-
-
-
-
-
A colored LED tells me the currently applicable alarm code . If it should Freeze, a white Led will give me a warning
At the end of 2018 I’ve found on one of the Ham fora I daily check, a new design by Kees, K5BCQ. He was busy to design a new CW Keyer project with a Digital CW Decoder included, based on other designs of the K3NG Memory keyer.
All options, described in the Wiki by K3NG, should be included !
K5BCQ has developed succesfull many Ham Radio designs in the past. So, for me this was the trigger to join this project.
The basis design of the K3NG keyer consists of a Arduino based CW memory keyer. Its a very flexible design with many options. Its comparable with commercial available products.
Kees, K5BCQ, designed a total-
I was very glad that Kees, accepted me as one of his Beta-
I’ve build this design succesfull twice, with much pleasure.
Now I’m searching for a good enclosure :-
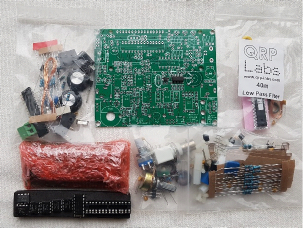
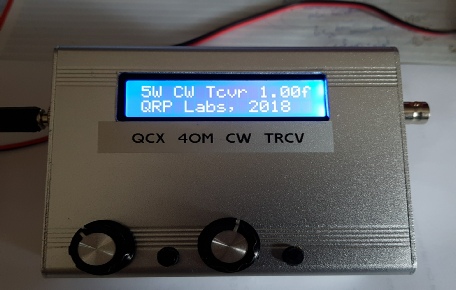
QRP-
The company QRP-
Its a small single band, QRP CW tranceiver, with a CW decoder included and a small LCD display. More than 8000 of this QCX DIY kits has been sold !
Thats the reason I decided to order one and build this
small CW tranceiver
This “QCX” is a 5 Watt single-
The DIY-
This QCX-
In Summary
Building the right way, and adjusted correctly, using a 13.8 V power-
Are you looking for a nice small DIY CW tranceiver, than this “QCX” tranceiver is a good choise. It is worth looking around there. And if you do, see all the other nice DIY projects :-
I found it nice to build this CW tranceiver project. I have made some nice QSO, with it, and it helps me to brings up my CW skills again.
If you want to know more, just visit http://www.qrp-
Happy building
Oh… by the way…. The hart of this “QCX tranceiver”, runs on a Atmel Atmega32p processor…hi…
Arduino weatherstation with a NodeMCU
After all those CW related projects, it was time for something else….
I found a new project regarding a Arduino related Weather station.
During the summer of 2019, we had temperatures above 40 Dgr Celsius. Some days there was al weather alarm code warning Yellow and Orange, and some day it was almost code Red !
This was very unique. Normaly we have codes Yellow and Orange in the Fall and Winter periods with bad weather, and than we disconnect our antenna cables in case of thunderstorms and havy winds.
But these rare temperatures and warnings gave me the idea to build a Arduino Based weatherstation and have all parameters of the weather in sight.
I remembered myself, that I have read a article about small Arduino weatherstations and warningscodes in a Computer magazine in April 2018. Time to look it up !

In the magazine they described 2 small projects. One of them using a very small OLED display with the size of only 0.91 inch and displaying the weather conditions. The other project used separate color leds to show the leading weather-
My challenge, to combine these 2 project and using a larger LCD display
Arduino with WIFI
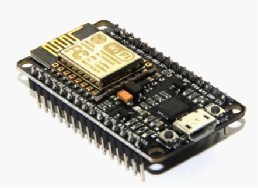
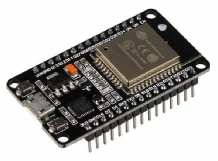
This project is based on a Arduino liked microcontroller with a Wifi module on board. The NodeMCU.
This NodeMCU is in fact no real Arduino but a controller-
NodeMCU modules are very cheap, and you can program them with the Arduino IDE.
The structure of the weather station
To build this project and conncet al the components, I have used a experimental PCB board. I’ve used a 40 pins IC socket, cutted in halve, to use as a socket for the NodeMCU. NodeMCU modules are much wider than regular 40 pins IC’s.
To connect the LCD display, I’ve used a female header in addition to the NodeMCU and used a 8 wire band-
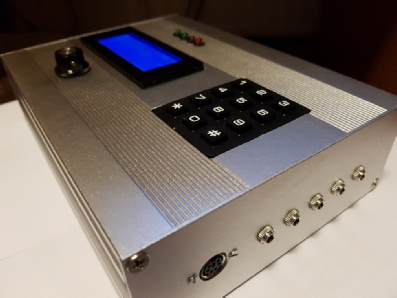
New Version of the K3NG CW memorykeyer / CW decoder
After playing a while with this CW keyer / decoder, I decided to make another one with a small keypad to choose the programmed memory’s. In the meantime I did make a nice enclosure for this keyer / decoder.
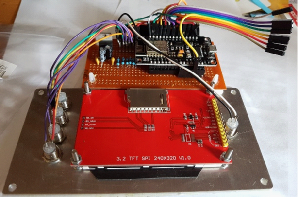
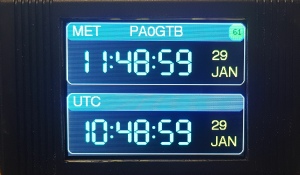
NTP HAM Dual Clock
After some time to have played wit a Raspberry Pi, Totally different than Arduino, I wanted make a Arduino related project again.
I’ve found on Internet a small NTP Time Server based project. A NTP Dual Clock.
It shows local and UTP time on 1 display and is synchronised every 30 minutes.
A Real Ham Clock !
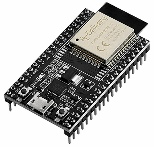
The project is build with a ESP32 module and a 3.2 inch TFT display. And, thats it….hi
I have expanded this design with a 12 V power supply unit, but its possible to just use a standard 5V USB Power Supply.
Perhaps you still have a old USB Telephone Charging unit in your drawer, you can use.
To start I have build everything together on a Breadboard. Modified the sketch for EU Time zones, and the correct date notification.
Via Internet I’ve found a little enclosure to put it in.
A nice little project in this Covid-
RAZZIES All Band Radio
It was a bad time to find a nice Arduino related project during the Corona period in 2020. Besides the bad conditions on the HF bands, all Ham radio Club meetings are canceled. So I was very pleased to find a nice project to do at home.
In the Raszzies magazine of the Dutch Ham Radio Club, PI4RAZ, at Zoetermeer, I found in the September issue a very nice All-
So when it was possible I’ve ordered an PCB and lokked on the Internet to order the parts. It lasted a couple of months before the PCB was available, But in March 2021 I received the PCB and get started to build this All-
ESP-
The project is based on a ESP32 chip, we already knew. PI4RAZ had described a perfect article about this project and also delivered all the necessary documentation and sketches. It was possible to use different versions of the Si473x All-
I decided to make a portable version of this project. Using a Lithium Battery and charging option.
Its a nice small design. Working great also on the FM Band using a small vertical telescopic antenna. I often put it on when I’m busy in the shack


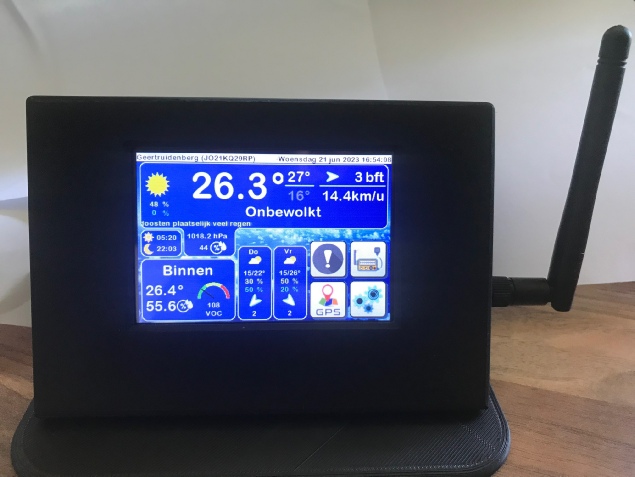
Extended weatherstation ( design PE5PVB )
One of the latesst projects, is a Extended Weatherstation, special designed for Ham Radio users.
Its designed by Sjef, PE5PVB for the Ham radio Camp week 2023 of VRZA
The weatherstation is designed with a ESP32 Controller and several Sensors. Its also using a Nextion Touch Screen Display.
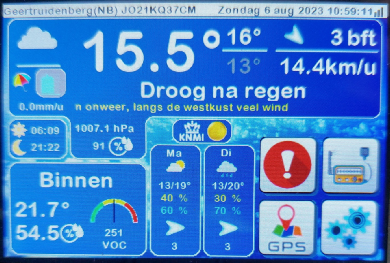
The presented formation is provided via Weerlive.nl, KNMI and Buienradar for Regional Weather information. Via a Belgian Ham Radio Site, Actual propagation for HF, VHF and UHF is provided.
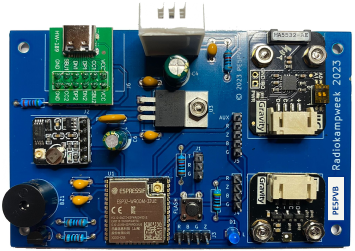
The Weather Station is using several sensors to give actual information of Indoor and Outdoor conditions.
- Actual weather information of your Region via Weerlive.nl
- Indoor temperature and Humidity
- VOC-
sensor (Air Quality) - Rain indicator in mm/u
- Outdoor Windspeed and Directions
- Regional Weather-
alarm (Green- Yellow- Orange- Red) - GPS-
sensor with antenna ( Place and QTH locator) - NTP date and Time (optional setting)
- Lightning detector
- Weather forecast for the next days to come
Ready mounted PCB printplaat
For the Weatherstation there is a 3-
| Old stuff |
| Atas |
| DL/PA0GTB |
| Digital Modes |
| Historie |
| Apparatuur |
| Informatie |
| QSL |